The 3-C Entry System: Handle, Cheat, and Low Cheat — Complete Guide
A complete SEPA guide to the 3-C Entry System: Handle, Cheat, and Low Cheat, explaining cup-base entry zones, VCP contraction, stop distance, position sizing, and risk control.
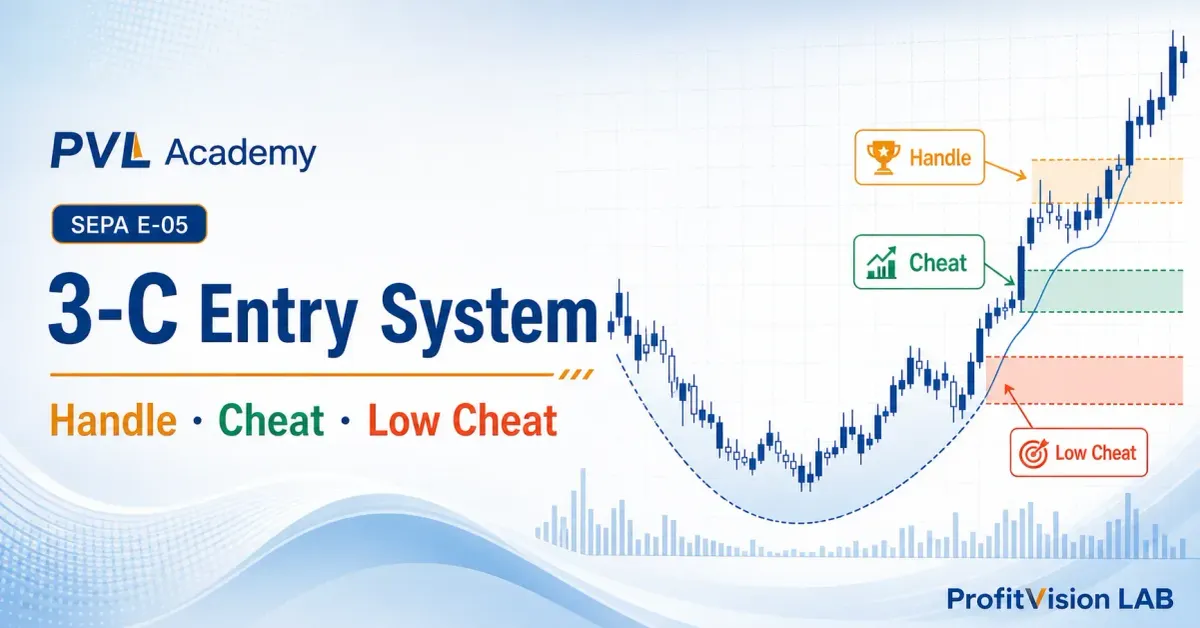
- The 3-C System (Cup Completion Cheat System) divides a cup base into three vertical zones, each corresponding to a different entry logic: Handle (top 1/3), Cheat (middle 1/3), Low Cheat (bottom 1/3).
- Handle entry is the most standard CANSLIM cup-and-handle entry — lowest risk, but requires waiting until price returns near the cup rim; Cheat and Low Cheat are early-entry tools suited for opportunities with higher conviction.
- The name "Cheat" comes from the idea that you enter in the "middle" of the cup's journey from bottom to rim — you're "getting in early" before the formal breakout. This is not deception; it's positioning early when supply/demand logic is already establishing itself.
- The lower the entry zone (Low Cheat > Cheat > Handle), the smaller the stop-loss distance — but the higher the conviction required, because lower entries are closer to the bottom where the pattern can fail, and losses approach your full stop percentage.
- The 3-C System integrates perfectly with VCP: the successive T contractions in a VCP often correspond to the Cheat and Low Cheat entry zones of a cup base. Overlaying both frameworks lets you precisely identify the risk/reward of each entry opportunity.
The 3-C Entry System divides the right side of a cup base into three entry zones: Handle near the rim, Cheat in the middle, and Low Cheat near the bottom.
The key trade-off is confirmation, stop distance, and position size: the lower the entry, the earlier and cheaper it is, but the more it depends on VCP contraction, low-volume support, relative strength, and strong fundamentals.
Operating conclusion: most investors should master Handle and Cheat first; Low Cheat should be a small-position tool used only in strong markets with strict stop discipline.
Why Is the 3-C System Needed? The Limitations of Standard CANSLIM Entry
In O'Neil's standard CANSLIM framework, the entry point for a cup-and-handle pattern is the breakout above the handle's upper edge — that is, the stock consolidates near the cup rim forming a handle, and you enter when price breaks above the handle high. This is the "Handle" zone — the so-called orthodox breakout point.
In practice, waiting for the orthodox breakout has one problem: by the time the stock reaches the cup rim, it may have already had a substantial rally from the low. If you enter on the right side of the base, in the lower zone after the decline has stopped and bounced (about one-third up from the low — Minervini calls this Cheat / Low Cheat; the two O'Neil disciples Morales & Kacher call it the Pocket Pivot buy point), your cost basis is much lower than someone who waits for the Handle breakout (the upper half of the right side, around the two-thirds high) — smaller stop distance, greater potential reward. Remember: never trade the left side (the decline); always wait for the stop and the bounce before acting — passing up that left-side move is how you raise your win rate and keep long-run expectancy positive.
That is the design purpose of the 3-C System: based on the vertical position within the cup base, systematically identify three entry opportunities with different risk/reward characteristics, so investors with different conviction levels and risk tolerances can each find an appropriate entry point.
The Three Vertical Zones of a Cup Base
A practical example: if a cup base has a high (cup rim) at $100 and a low (cup bottom) at $70, then:
- Handle zone: $90–$100 (near the cup rim)
- Cheat zone: $80–$90 (middle section)
- Low Cheat zone: $70–$80 (near the bottom)
All three entries are on the right side, after the decline has stopped and bounced; the left-side decline is never traded.
Handle Entry: The Gold Standard of CANSLIM
Handle entry is the approach most favored by O'Neil's CANSLIM and regarded by Minervini as the "lowest risk" standard entry position.
Handle Quality Criteria
- Forms in the top 1/3 of the cup (closer to the rim is better)
- Pullback depth typically no more than 8–12% (a handle that is too deep shows persistent selling pressure)
- Duration of 1–4 weeks (too short doesn't qualify as a handle; too long may signal pattern deterioration)
- Volume contracts during the handle (dry-up consolidation, no heavy selling pressure)
- The handle itself can be a small VCP (the final T at the handle bottom)
Stop-loss for a Handle breakout entry is set below the handle low — typically a 5–8% stop distance.
Cheat Entry: The Mid-Zone Early-Bird Opportunity
Cheat entry involves identifying a completed VCP pattern in the middle section of the stock's journey from cup bottom to cup rim (the 1/3 to 2/3 zone) and entering there.
When to Consider a Cheat Entry?
A Cheat entry may be meaningful when you observe the following:
- The stock has completed the T1 contraction and is now in T2 contraction, with T2's depth clearly smaller than T1
- The bottom of T2 falls in the Cheat zone (1/3 to 2/3 below the cup rim)
- After T2 ends, price rebounds from the bottom with a Pocket Pivot volume signal appearing
- The stock's fundamentals are very strong (EPS accelerating, RS Rating extremely high), giving you greater conviction
The stop-loss for a Cheat entry is set below the T2 bottom. Since you're entering mid-way, the stop distance is smaller than a Handle entry — but you must tolerate more uncertainty, because the stock still needs to continue rising to the cup rim for final confirmation.
So for swing traders, my advice is to start entering from the Cheat zone (the middle, after two T's), and leave the lowest, earliest, least-confirmed Low Cheat for the rare cases where conviction is extremely high and you'll hold the discipline.
Low Cheat Entry: The Maximum Efficiency Opportunity Near the Bottom
Low Cheat is the most aggressive entry approach — entering after a VCP completes near the cup bottom. Because the entry price is extremely low, the stop distance is very small and return potential is greatest. But the risk of failure is also highest — if the pattern ultimately fails, a pullback from the bottom can result in losses that are double or more compared to a Handle entry.
Strict Conditions for Low Cheat Entry
- The stock's RS Rating is extremely high (typically 90+) and fundamentals are impeccable
- A clear VCP pattern (T1 and T2) appears near the cup bottom with sufficient volume contraction
- The broad market environment is very strong (e.g., a Follow-Through Day has just occurred, market is in early uptrend)
- Use a smaller position on entry (recommend no more than 50% of your standard size), add on the Handle breakout
- Smaller the lower you go: start Low Cheat with ≤ 20% of the planned position, build to ~50% at Cheat, and only fill to full on the confirmed Handle breakout. The higher the confirmation, the larger the position — consistent with the three-tool sizing logic in E-04.
- The Achilles' heel of a low entry is "can't pull the trigger to sell": once the pattern breaks (a close below the T low), stop out immediately. The most common blow-up is "sneaking in at the bottom, then holding and hoping after it breaks." The price of sneaking in early is that you cut just as readily.
Integrating the 3-C System with VCP
The 3-C System and VCP are perfectly complementary frameworks. In practice, when you're identifying the successive T contractions in a VCP, you can simultaneously identify which zone of the cup base each contraction falls in:
| T Contraction | Typical Cup Position | 3-C System Zone | Recommended Action |
|---|---|---|---|
| T1 (first major pullback) | Near cup bottom, bottom 1/3 | Low Cheat zone | Observe only unless extremely high conviction |
| T2 (second pullback) | Between bottom and rim, middle 1/3 | Cheat zone | Consider partial position if fundamentals are strong |
| Final T (handle pullback) | Near cup rim, top 1/3 | Handle zone | Standard entry point — enter on breakout as planned |
A Complete 3-C Example
Suppose you're tracking a stock with RS Rating 95, EPS accelerating for three consecutive quarters, forming a cup base with a cup rim at $100 and cup bottom at $72.
Low Cheat opportunity ($72–$82): At around $74 you see a complete T1 contraction with shrinking volume and the RS Line still rising. You enter with 20% of your planned position at $77, stop-loss set at $73 (below the T1 bottom). Stop distance ~5%.
Cheat opportunity ($82–$91): The stock rises from $77 to $86 then pulls back to $83 (Cheat zone), forming a T2 VCP. You add another 30% of your planned position at $85, stop at $81. Blended average cost ~$81.40.
Handle opportunity ($91–$100): The stock continues to $93, then forms a handle, pulls back to $90 before breaking out at $94. You add the final 50% of your planned position at $94 with volume confirmation. Overall average cost ~$88.
If the stock ultimately reaches $140, your total return is approximately +59% — versus ~+49% if you had waited and entered the full position on the Handle only. The early entries substantially boosted overall returns, but every entry had a clear stop-loss defined.
- Which of the 3-C patterns is it? Handle, Cheat, or Low Cheat? Their entry price, stop, and proper position size are completely different — copy the price but use the wrong stop and size, and you've bolted someone else's entry onto your own broken risk control.
- How large is the market cap? Personally I prefer names with a market cap above $10B: large caps are more liquid, harder to get shaken out of, and the patterns are more reliable; small caps are noisier and far less suited to blind copying.
Frequently Asked Questions
What is the 3-C Entry System?
The 3-C Entry System divides the right side of a cup base into Handle, Cheat, and Low Cheat zones so investors can match entry timing, stop distance, and position size to the setup's confirmation level.
How are Handle, Cheat, and Low Cheat different?
Handle is closest to the cup rim and has the highest confirmation but later entry. Cheat sits in the middle and balances confirmation with better reward efficiency. Low Cheat is closest to the bottom, earliest, and requires the strictest discipline.
Why should Low Cheat not use the largest position size?
Low Cheat may have a shorter stop distance, but it also has the lowest confirmation. Using the largest size simply because the stop is tight can create the worst psychological and capital damage when the pattern fails.
How does the 3-C System connect with VCP?
VCP confirms whether supply has been absorbed, while 3-C marks the price zone. Overlaying both frameworks tells you whether the contraction is near the bottom, in the middle, or near the rim, which then guides entry size and risk control.
Further Reading and System Position
- Handle: handle low must not break the mid-line of the full cup; enter after volume contraction confirmed
- Cheat: entering before pattern is complete — reduce position to ≤50%, leave room to add
- Low Cheat: highest risk; use only when overall environment is strong and conviction is high
- Assuming "earlier entry = higher win rate," ignoring that early entry requires larger stop buffers
- Entering Low Cheat then not executing the stop when the pattern fails — holding and hoping
- Applying the same position size and stop settings to all three tools without risk-tiering
- In uncertain overall market environments, early-entry pattern failure rates rise
- Without full Handle/Cheat recognition training, subjective judgment errors are large
- Early entry without position-size reduction means a single failure can cost more than a Standard Pivot loss


Comments ()